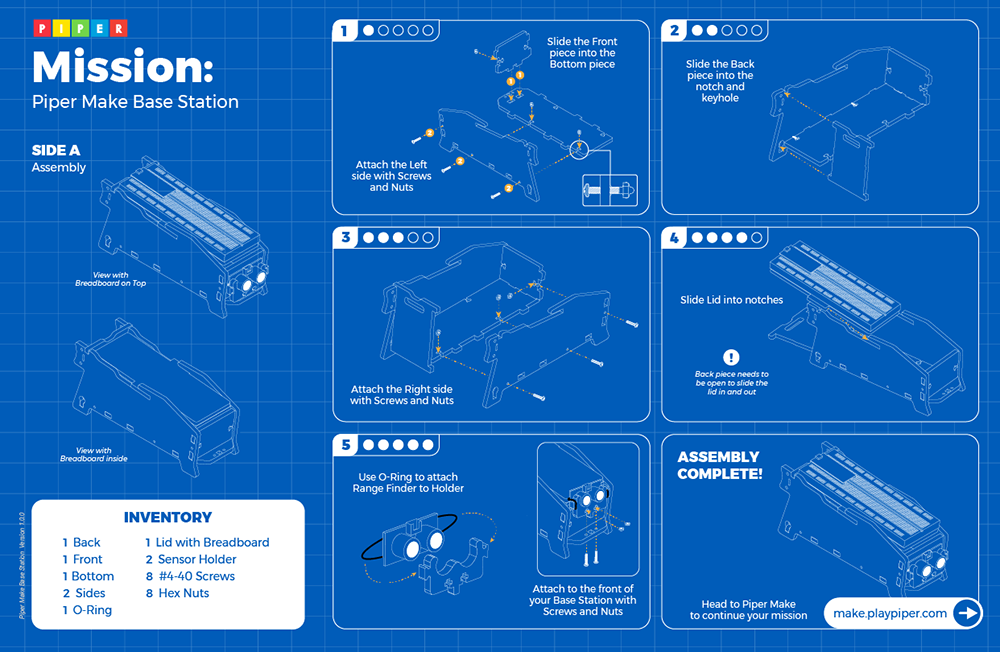
Build the Piper Make Base Station, the foundation for all upcoming missions.
Piperbot is almost ready for adventure — but first, they need a brain to think, move, and react! That’s where the Base Station comes in. By building the Base Station, you're giving Piperbot the power to sense, decide, and act. Carefully connect the microcontroller, breadboard, and parts — your build will bring Piperbot to life!
Students will learn how software and hardware work together to form a system.
Students will model how computer hardware and software work together to complete tasks.
Students will determine potential solutions to solve simple hardware and software problems using common troubleshooting strategies.
Students will understand fundamental concepts of how technology works, demonstrate the ability to choose and use current technologies effectively, and are adept at thoughtfully exploring emerging technologies.
I WILL BE ABLE TO...
Identify and organize key electronic components
Build a Piper Make Base Station using a blueprint
Understand the role of the microcontroller, breadboard, and power rails
Begin troubleshooting basic assembly errors and miswiring
Learning Activities
Unboxing + Component Identification
Students match physical components to a printed parts sheet and check off as they go.
Blueprint Walkthrough
Guided activity where students locate where each component fits and learn visual schematics.
Base Station Assembly
Hands-on build experience with guided troubleshooting tips as needed.
Career Connections
Electrical Engineer: Salary $127,260/yr
Electro-Mechanical and Mechtronics Technicians: Salary $60,570/yr
Have an different version? Look for more information on the Support Page.
Troubleshooting Tips
Students will need to save the PCBA (Printed Circuit Board Assembly) for the upcoming Traffic Light Mission!
Our customer support specialists are on hand to ensure your implementation of Piper runs seamlessly. View Support Docs or Contact Support
EXPANDED RESOURCES
Term Glossary
Breadboard A plastic board with many holes electrically connected by inner metal strips. Components and wires can be electrically connected by plugging them into the holes on the breadboard.
Microcontroller An integrated circuit containing a microprocessor with memory and associated circuits.
Jumper Wires Wires used to connect from the GPIO to the breadboard. Jumper wires can have different kinds of connections on their ends, such as plugs, sockets, or alligator clips.
Power Rails Power rails provide a way to connect power supplies, like batteries or power adapters, to a circuit. They usually run along the sides of the breadboard, with the ground rail often on the lower side and the voltage supply rail on the top side.
Blueprint A detailed plan or a map for building something.
The Raspberry Pi Pico is a single board microcontroller that plugs into a Breadboard to be used for prototyping and wiring with electronics using GPIO pins. A microcontroller is a compact computer. The pins on the Raspberry Pi Pico are numbered so that you can code for specific outcomes with electronic components by wiring them up to the microcontroller.
The pins on the Raspberry Pi Pico are numbered so that you can code for specific outcomes with electronic components by wiring them up to the microcontroller.
Jumper Wire
Jumper wires are used to connect components of a circuit on a Breadboard and to the microcontroller. The colored coating of the wire is an insulator, and prevents wires from shorting. A wire shorts when unintentional connections in a circuit are formed, causing high currents or overheating. Additionally, the colored coating allows you to stay organized, but the Jumper wires can be used interchangeably regardless of color!
Jumper wires are made of a conductive material called copper that allows current to flow from a power source to the components of the circuit and back to the ground in order to form a conductive loop. A closed circuit is created when there is a complete conductive loop. Jumper wires allow you to do this with a microcontroller and the Breadboard as well as components, like an LED.
 Computer with USB port and Chrome or Edge browser
 Piper Make Base Station or Starter Kit

 Electrical Engineer: Salary $127,260/yr
 Electro-Mechanical and Mechtronics Technicians: Salary $60,570/yr
 Industrial Designer: Salary $99,290/yr