Close menu

Resources


PIPER COMPUTER

Everything you need to teach STEAM effectivly using the Piper Computer Kit.

Educator Guides StoryMode Project Guides PiperCode Project Guides
PIPER MAKE

Teach fundamental STEM skills while providing a bridge to career connected learning.

Educator Guides
Best Practices Standards Glossary FAQ Educator Forum

EDUCATOR PORTAL

Close menu

ALL GUIDES


  1. What is a Computer?
  2. Executing a Plan
  3. Practicing Flexibility
  4. Completing a System

  1. Buttons & Breadboards
  2. Basic Inputs & Outputs
  3. Polarity & Audio Output
  4. Parallel Circuits

  1. Intro to Computational Thinking
  2. Loops & Sequences
  3. Events
  4. Programming with Lights & Sounds
  5. Completing Additional PiperCode Projects

  1. Extend in Storymode
  2. Design a Bot & Make Music
  3. Redesign a Stoplight
  4. Engineering Design with Piper

  1. Take Apart and Reflection
  2. Computers in Everyday Life
  3. The Environmental Impact of Computers
  4. Final Design Challenge

  1. What is Color?
  2. How Do We See Color?
  3. How Does the Color Sensor Detect Color?
  4. RGB in Computing

  1. The Water Cycle
  2. What is Temperature?
  3. What Are the States of Matter?
  4. Phase Changes

  1. Motion Introduction
  2. How Do Waves Help Us Understand Patterns?
  3. Creating Devices That Use Data
  4. Graphing Motion

  1. What is Energy?
  2. The Energy Behind Reduce, Reuse, Recycle

PIPER COMPUTER

EDUCATOR GUIDES


YOU ARE HERE

Phase 3

Lesson 3.3

Phase 3: Lesson 3.3

Events


45 - 60 mins

Grades 3 - 8

INTRODUCTION
In this lesson, students will complete the Light Show project, which challenges them to practice key electronic and programming skills by orchestrating cause and effect. Students will learn about conditionals and how to use them in their code to make an event occur.

GETTING STARTED

Lesson Materials


Piper Computer Kit

Learning Objectives

The goal of this lesson is for students to refresh their learning of Piper hardware and electronic components and dive into computational tinkering!

Students complete the Light Show project, in the initial Learn PiperCode cluster, which challenges them to practice key electronic and programming skills by orchestrating cause and effect.
Students will:
  1. Practice breadboarding and wiring.
  2. Understand the computational concept of events: one thing causing another thing to happen.
  3. Explore computational thinking design practices, including experimenting, iterating, and debugging.
  4. Create programs that include events, loops, and conditionals.
  5. Decompose problems into smaller, manageable tasks which may themselves be decomposed.
  6. Create programs by incorporating smaller portions of existing programs to develop something new or add more advanced features.
  7. Test and debug a program or algorithm to ensure it accomplishes the intended task.
  8. Perform different roles when collaborating with peers during the design, implementation, and review stages of program development.

Lesson Preperation

  • Complete the coding and electronic builds yourself. Review the project guide for Light Show.
  • Suggested student-to-kit ratio is 2:1 up to 3:1. Students are in the same teams as before, or make adjustments as necessary to facilitate good teamwork.
  • Make sure Piper kits are built, connected, functioning, and batteries are charged for the Raspberry Pi.
  • Retrieve student team storage boxes with Piper build components.
  • Provide storage devices to teams to hold electronics - such as paper plate or paper cup or plastic box.

PIPER 5E INSTRUCTIONAL MODEL

Engage

Introduction (5 minutes)
  1. Teacher-led discussion:
    • Ask students what they think the Light Show project will be about. How will it be different than the Stoplight project?
  2. Teacher-led discussion:
    • Revisit the PiperCode Ideas Map.
    • Ask students to add discoveries from the prior project and address misconceptions.
    • Tease out the main concepts and design practices or ask students to explain more to the whole group if they are giving just fragments of answers.
  3. Remind students of the rules around troubleshooting on their own or asking a partner before asking for help from an adult (SAY: ask three before me!).
  4. Remind students of roles to play in teams and that they should be switching roles.

Explore

Main Activity (30-40 Minutes)

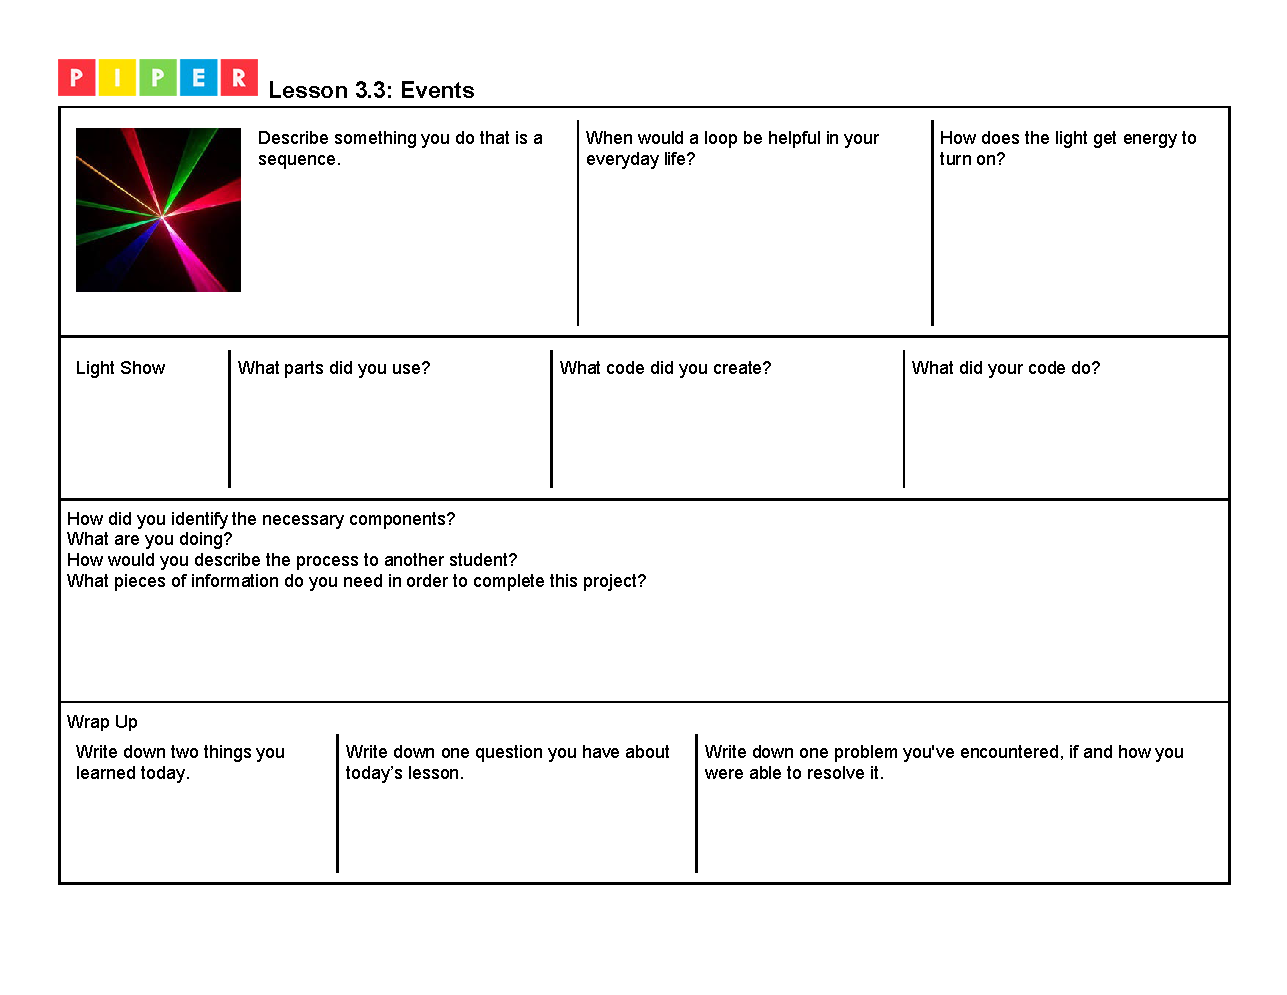
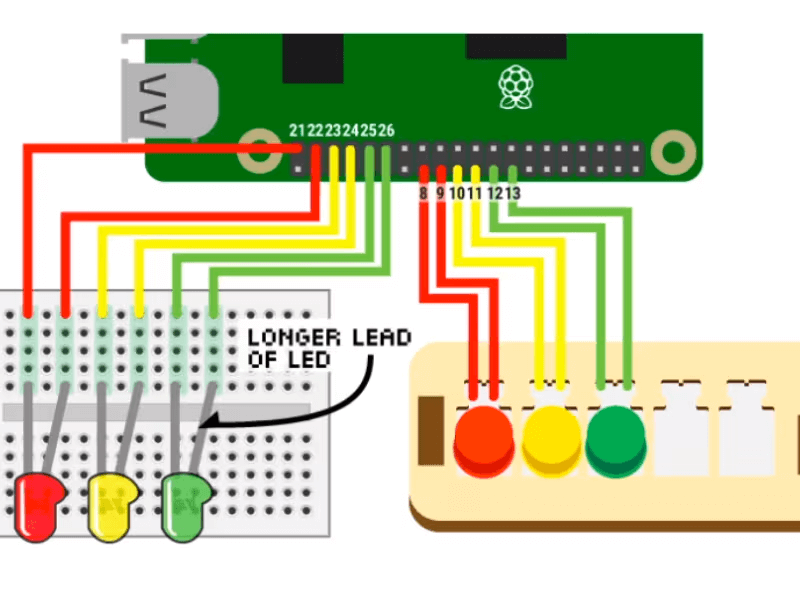
Encourage students to go through the Light Show project steps in their groups.

During this time, roam around the room, asking the essential questions* of this lesson:
  • What is triggering the ‘repeat until’ block to take an action?
    Example Answer: The pin is on which means the button is pressed.
    What action is taken?
    Example Answer: The pin for the LED is turned on.
  • How do you know which LED will light up when a particular button is pressed?
    Example Answer: The pin being turned on in the repeat block is where the LED is wired to the GPIO.
  • How does nesting one repeat block inside another work? How do you know how many times each sequence of code will happen?
    Example Answer: Nesting one inside the other ensures that the event occurs on a loop while all other code components simultaneously occur on a loop.
  • Talk me through your code like it’s step-by-step in regular English. What does each code block do?
  • If your code is not working or your lights are not behaving like you want, how do you fix it?
* These checks for understanding help reinforce learning of computer science skills such as creating programs that use include events, while testing and debugging a program or algorithm to ensure it accomplishes the intended task. (CA CS 3-5.AP.12 & 17)

Explain

Debrief Activity (15-20 Minutes)
  1. Review vocabulary words and definitions that were encountered during the lesson, especially events, debug, troubleshoot, iterate, condition, loop, sequence, binary, and state. Ask students to explain the terms in their own words.
  2. Go around the room to each team and have students demonstrate their solution. Use the pictures in the Light Show Project Guide’s breadboard and code solution for review. Ask students to explain what their code is doing and how it relates to the circuit. Provide feedback and praise to each student. If one student in a team is not answering, encourage him/her to provide the answers. ​

Elaborate

Concept Review (10-15 Minutes)
  1. Students take a picture of their control panel, circuits, and code. After completing projects, students take apart any circuits on separate breadboards and return parts to their proper bag in the storage bin.
  2. Students put kits away to avoid distractions during teacher-led discussion.
  3. Teacher-led Discussion:
    • 3.3 SLIDES - Events
    • Review major concepts and link to when they learned them while building PiperCode. Ask them to cite examples of their code when describing what they have learned.
    • Remind students of alternative explanations.
    • Refer students to alternative explanations about how the blinking was activated and sequenced. (Celebrate multiple ideas and solutions).
    • Ask students what new ideas should be added to the PiperCode Ideas Map.

Evaluate

Reflection (5 minutes)
  1. OPTIONAL: Have students add more to the PiperCode Ideas Map.
  2. Have students document the Light Show as a project in their Piper Journal. Include pseudocode, their block code, and a sketch of the circuit created. They should note any roadblocks and how they troubleshot solutions, or how they might build it differently the next iteration.
  3. Evaluate their Piper Journals and teamwork with a rubric.
  4. EXTENSION: Provide samples of circuit diagram components and circuit diagrams, and have students create circuit diagrams of the projects built in this lesson in their Piper Journal.

PHASE RESOURCES

Career Connections

Data Scientist: Salary $103,500/yr
Graphic Designer: Salary $58,910/yr
Web Developer: Salary $84,960/yr
Video Game Designer: Salary $83,240/yr

Graphic Organizer

Lesson 3.3 DOWNLOAD
Phase 3 DOWNLOAD

Term Glossary


Debug Finding and correcting errors (bugs) in programs.

Sequence The series of steps that must be completed to perform a task. Also called an algorithm.

State In electronics, a high or 'on' or 1 state indicates that a pin or component has electric current flowing, and a low or 'off' or 0 state indicates no current flowing. Also, the status or particular condition that something is in at a specific time - such as a button in a pressed state. In programming, a snapshot of the data a program is currently looking at or analyzing.

View Full Glossary

Standards Alignment


We are excited to be aligned with the following standards.


Concepts Standards

Computing Systems: Devices

CA 3-5.CS.1 Describe how computing devices connect to other components to form a system. (P7.2)

Computing Systems: Hardware & Software

CA 3-5.CS.2 Demonstrate how computer hardware and software work together as a system to accomplish tasks. (P4.4)

6-8.CS.2 Design a project that combines hardware and software components to collect and exchange data. (P5.1)

Computing Systems: Troubleshooting

3-5.CS.3 Determine potential solutions to solve simple hardware and software problems using common troubleshooting strategies. (P6.2)

6-8.CS.3 Systematically apply troubleshooting strategies to identify and resolve hardware and software problems in computing systems. (P6.2

Algorithms & Programming:

Algorithms

Variables

Control

Modularity

Program Development

3-5.AP.11 Create programs that use variables to store and modify data. (P5.2)

3-5.AP.12 Create programs that include events, loops, and conditionals.

3-5.AP.13 Decompose problems into smaller, manageable tasks which may themselves be decomposed. (P3.2)

3-5.AP.14 Create programs by incorporating smaller portions of existing programs, to develop something new or add more advanced features. (P4.2, P5.3)

3-5.AP.17 Test and debug a program or algorithm to ensure it accomplishes the intended task. (P6.2)

3-5.AP.18 Perform different roles when collaborating with peers during the design, implementation, and review stages of program development.

6-8.AP.10 Use flowcharts and/or pseudocode to design and illustrate algorithms that solve complex problems. (P4.1, P4.4)

6-8.AP.11 Create clearly named variables that store data, and perform operations on their contents. (P5.1, P5.2)

6-8.AP.13 Decompose problems and subproblems into parts to facilitate the design, implementation, and review of programs. (P3.2)

6-8.AP.14 Create procedures with parameters to organize code and make it easier to reuse. (P4.1, P4.3)

6-8.AP.15 Seek and incorporate feedback from team members and users to refine a solution that meets user needs. (P1.1, P2.3)

6-8.AP.17 Systematically test and refine programs using a range of test cases. (P6.1)

6-8.AP.19 Document programs in order to make them easier to use, read, test, and debug. (P7.2)

Impacts of Computing and Social Interactions

3-5.IC.22 Seek and explain the impact of diverse perspectives for the purpose of improving computational artifacts. (P1.1)

6-8.IC.22 Collaborate with many contributors when creating a computational artifact. (P2.4, P5.2)

Practices

P1. Fostering an Inclusive Computing Culture

P2. Collaborating Around Computing

P4. Developing and Using Abstractions

P5. Creating Computational Artifacts

P6. Testing and Refining Computational Artifacts


Concept Standard

Make observations to provide evidence that energy can be transferred from place to place by sound, light, heat, and electric currents.

Apply scientific ideas to design, test, and refine a device that converts energy from one form to another.

Generate and compare multiple solutions that use patterns to transfer information.

Generate and compare multiple possible solutions to a problem based on how well each is likely to meet the criteria and constraints of the problem (Performance Expectation).

Plan and carry out fair tests in which variables are controlled and failure points are considered to identify aspects of a model or prototype that can be improved. (P.E.3.4.7)

Integrate qualitative scientific and technical information to support the claim that digitized signals are a more reliable way to encode and transmit information than analog signals.

Digitized signals (sent as wave pulses) are a more reliable way to encode and transmit information (inputs and outputs).

Evaluate competing design solutions using a systematic process to determine how well they meet the criteria and constraints of the problem.

Optimizing the Design Solution Different solutions need to be tested in order to determine which of them best solves the problem, given the criteria and the constraints.