Learn how to use light show bitmaps in a sequence to create an animation like those used in films or cybersecurity.
Piperbot and Pip are trying to say hello to the Master Maker’s City! Write a scrolling message with your Light Show, and create interesting animations that, when looped, create animations and motion with lights.
Students will reinforce their knowledge of wait times in programming and how they affect movement, speed, and frame rate.
Learning Activities
The following sections will contain step by step instructions for ELA, ELD and Math extensions directly related to this mission. Adjust the directions to fit your ELA, ELD and Math standards.
Cybersecurity Extension: Secret Message
Create a secret message using bitmaps and send it to someone else.
Student A will build code with their Light Show and then send it via Google Drive to Student B. Student B can then use the “Import” feature in Creative Mode to upload this code to PiperMake and read it with their own Light Show.
Discuss how this exchange of information is technically end-to-end encryption – as the Light Shows serve as encryption and decryption devices while the intermediate (the PNG code) is technically not readable.
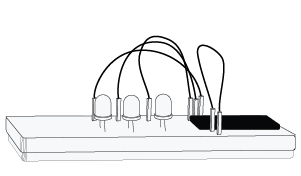
Notice the orientation of the Light Show LED Matrix Board in the wiring image. Follow the wiring diagram and correctly place the wires, some of which will cross, on the Breadboard.
The color of the Jumper Wires in the diagram may be different from the colors in your kit. Jumper Wires can be used interchangeably. The color does not represent any difference in the Piper Kits.
To change the colors on your Light Show LED Matrix Board, click above or below the text on the Pixel Grid block, and the color choices will appear.
Is the Start button not green? Don’t forget to connect your Pico.
Our customer support specialists are on hand to ensure your implementation of Piper runs seamlessly. View Support Docs or Contact Support
DESIGN EXPEDITION RESOURCES
Material Library
SERVO
A servo, which is short for servomotor, is a special kind of motor that is used to control something by moving it. A simple motor moved by spinning continuously. A servo turns to a specific position and it uses gears to transform the high speed of the motor into more force so it can move things more easily.
The servo is connected using three wires: one for ground, one for power, and one for a signal that tells the servo motor what position to turn to. The Pico tells the servo what position to turn to by changing the width of the pulse that it is sending out. A pulse with a shorter "ON" time will turn to one side, and a pulse with a longer "ON" time will turn to the opposite side.
The motor inside of the servo turns very fast, but it is also weak - it cannot apply very much force. The gears inside the servo convert the motor's high speed and low force into a slower speed with more force.
Career Connections
Robotics Technician: Salary $60,570/yr
Automotive Engineer: Salary $95,300/yr
Civil Engineer: Salary $88,050/yr
Industrial Designer: Salary $75,910/yr
Standards Alignment
CSK12 Framework
CA 3-5.AP.17. Test and debug a program to ensure it accomplishes the intendedtask.
CA 3-5.CS.2. Demonstrate how computer hardware and software work together as a system to accomplish tasks.
CA 3-5.CS.3. Determine potential solutions to solve simple hardware and software problems using common troubleshooting strategies.
 Computer with USB port and Chrome or Edge browser
 Piper Make Starter Kit
 Piper Make Light Show


 Robotics Technician: Salary $60,570/yr
 Automotive Engineer: Salary $95,300/yr
 Civil Engineer: Salary $88,050/yr
 Industrial Designer: Salary $75,910/yr