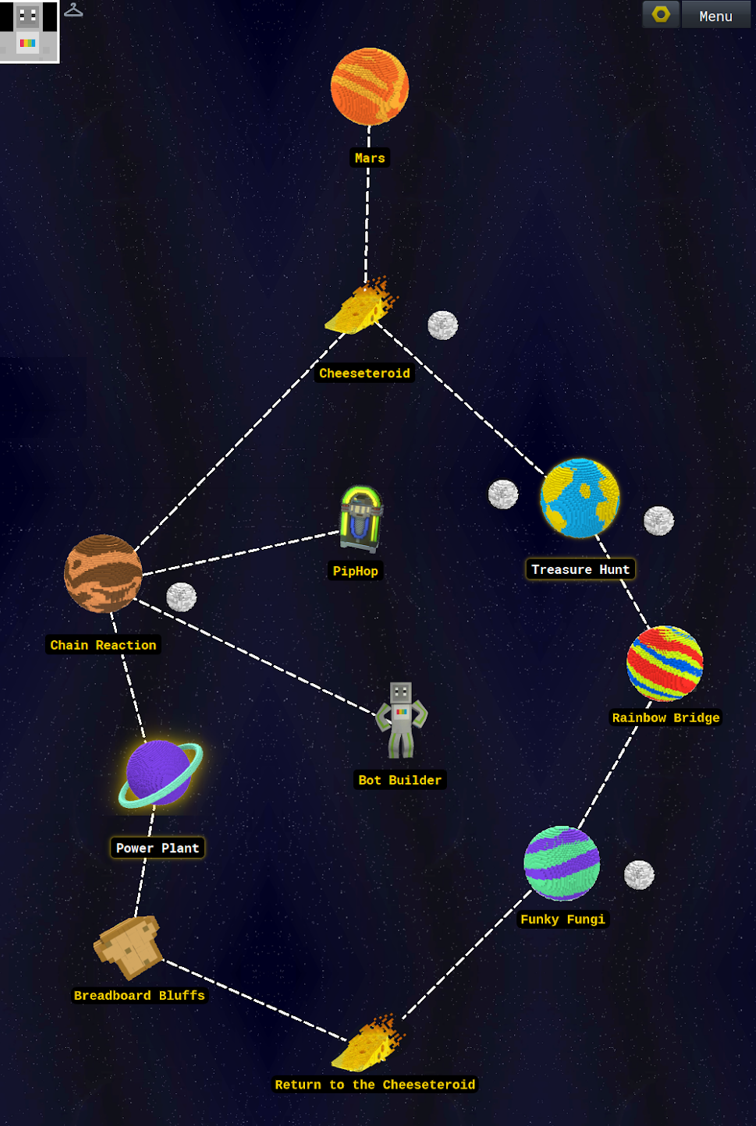
In this lesson, students play the first two levels of Piper StoryMode: Mars and Cheeseteroid. In these levels, students learn how to complete a circuit and connect basic series circuits with buttons, and jumper wires using a breadboard.
Having built the Piper Computer Kit in Phase 1 and learned the physical structure and functions/purposes of the all parts, students will now begin StoryMode on their Piper Computer Kit. The StoryMode projects are arranged as planets in the user interface. The story for each planet will guide learners through the fundamental concept of wiring a circuit and understanding how circuits on the breadboard work. As they complete one story (sometimes referred to as a level), the next one unlocks. This lesson goes through the first two StoryMode projects: Mars and Cheeseteroid.
Students will:
Practice breadboarding and wiring.
Understand wire and pin positions for specific buttons.
Understand that power in circuits flows from positive to negative, through a component.
Understand the difference between closed and open circuits.
Make observations to provide evidence that energy can be transferred from place to place by electric currents.
Describe how computing devices connect to other components to form a system.
Perform different roles when collaborating with peers.
Lesson Preperation
Review background materials and hints at the Minecraft Wiki.
Go through the Mars and Cheesteroid stories yourself, follow the directions on the screen, and build the circuits. (Don’t forget to turn on the speakers so you can hear the directions.) Review the Piper Quick Guide for Mars and Cheesteroid. Note: There are links in the Level Guides for the whole class to view level animations together.
If more than one group uses the Piper computer, you can lock and unlock levels (found in settings).
Review your favorite teacher science materials for Electronics and Circuits background.
Suggested student to kit ratio is 2:1 up to 3:1. Students are in the same teams as before, or make adjustments as necessary to facilitate good teamwork.
Make sure Piper kits are built, connected, functioning, and batteries are charged for the Raspberry Pi and the speaker.
Retrieve student team storage boxes with Piper build components.
Provide storage devices to teams to hold electronics—such as paper plates, paper cups, or plastic boxes.
Review “top ten concepts” learned in Phase 1 and tease with next 10 OR have group brainstorm “wonders” about further concepts they want to learn about how (and why) computers are built this way.
Review the team roles that students will play and encourage them to switch roles throughout the day so that everyone has a turn. Suggestions: Driver is controlling the mouse and following instructions in the Minecraft story. Engineer is building the circuit using the parts. Navigator is finding and returning parts and giving them to the engineer and also assisting driver and engineer troubleshoot problems as they arise. (If only two students per team one is both engineer and navigator).
Introduce game and tell students that they will be learning how to make Piperbot move using buttons and wiring connections. Tell them to make sure their speakers are on and pay close attention to the instructions on the screen. Their friend Pip the Martian mouse will guide them.
Explore
Main Activity (30-40 minutes)
Guide students through completing Mars and Cheeseteroid worlds. In the Mars game, the Left, Forward, and Right buttons are built on the breadboard acting as the "game controller". In the Cheesteroid game, a Jump button is added to the controller.
Total 50% of Class Time
While students are working on their projects, roam around the room, asking the essential questions of this lesson*:
What happens when you press the button (both in the physical and electrical worlds and inside the computer)?
Example Answer: In the physical world, the button is pressed which pushes a piece of metal down to complete the conducting loop of the circuit inside of the button. In the electrical world, this allows the current (charge) to flow through the wires.
Why do we need two wires per component?
Example Answer: To ensure that current can flow through a full conducting loop from + to negative.
What are the wires doing? How are they helping to make the buttons work?
Example Answer: The wires are connecting the power to the button so that charge can run through them. When the button is pressed, the wires allow current to run through the circuit in a full conducting loop.
If there is electric current flowing through the wires, why aren’t you getting shocked when you connect them?
Example Answer: There is insulating material that restricts the flow of charge between your fingers and the wires.
*The above checks for understanding help reinforce the science skill of making observations and providing evidence that energy can be transferred from place to place, through sound, light, heat, and electric currents (NGSS (4-PS3-2) &(4-PS4-2))
Note: Students may have trouble getting the buttons to work. Remember that good contact is the key to electric flow. Buttons and wires need to be properly aligned and seated in the breadboard. Students may need assistance getting the wiring just right.
Review vocabulary words and definitions that were encountered during the lesson.
Closing Activity (10-15 minutes)
Students put kit away to avoid distractions during peer led discussion.
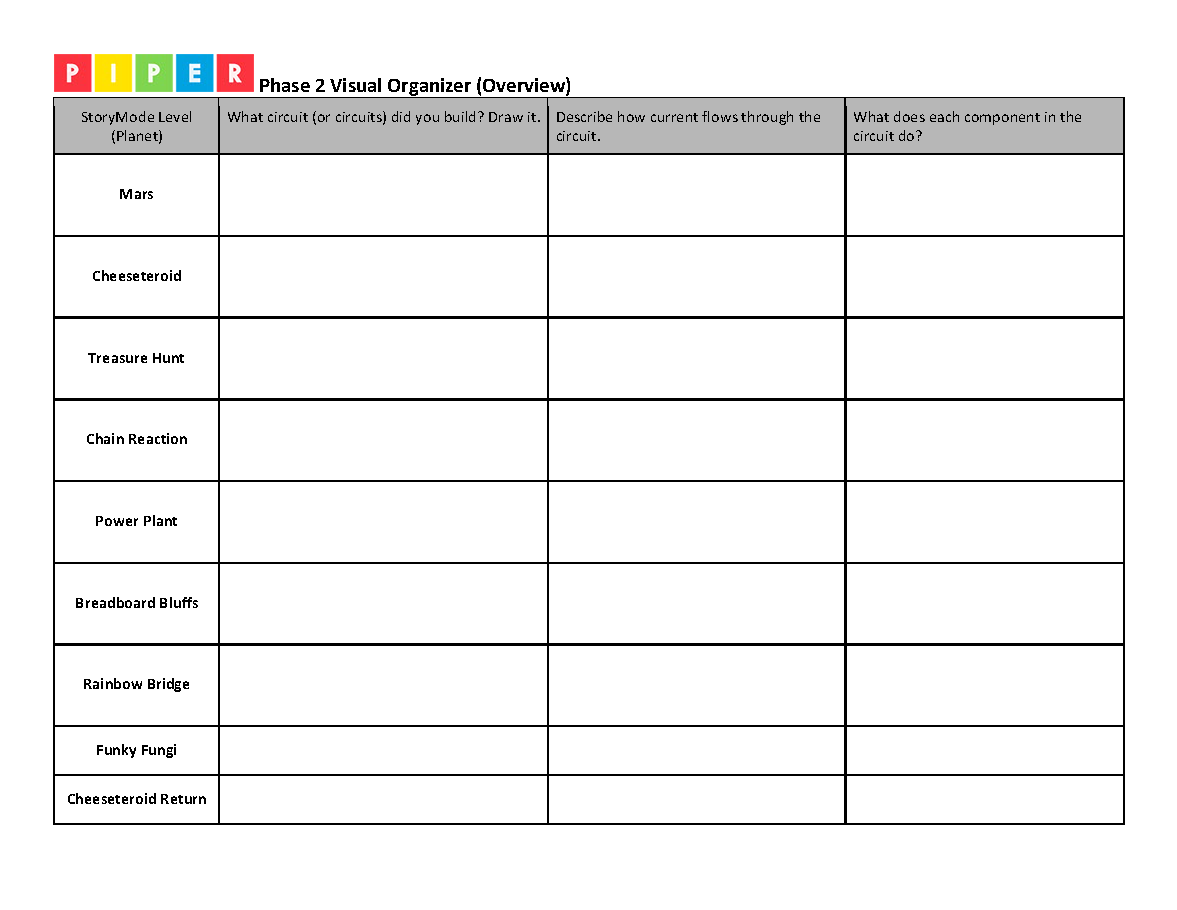
Students take a picture of their control panel and circuits. After completing the stories, students take apart any circuits on separate breadboards and return parts to their proper bag in the storage bin.
Once again demonstrate the proper shut down sequence for the Piper. (Students are accustomed to just closing their laptop or chromebook.)
Steps to shutting down the Piper Computer properly:
If you’re in the Piper software, click on the power icon at the top of the main menu. If you’re on the desktop, click on the Menu bar (raspberry icon).
Click on Shutdown.
Wait for the Raspberry Pi to completely shutdown. You’ll know it’s shutdown when the green LED on the Pi stops flashing (the red LED will stay lit).
Combine a few teams together in small groups of 4 to 6. Have individuals contribute questions/answers on the topic of breadboards and push buttons, giving references to the two Piper worlds they just finished that explored this new concept. Assign peer leaders to either document or summarize their group’s ideas. Provide prompts to help them get started:
What do we know about it?
How do we know that we know it? How did we demonstrate knowledge?
What got in the way of learning it?
What helped with learning it?
How can this knowledge be applied to a real-world engineering problem?
Find more tips on Peer led discussion from edutopia.org
Evaluate
Teacher Led Discussion (5% of class time)
Review Peer-led discussions. The success criteria for assessment of each group is responsive listening, thoughtful contributions, reflective thinking, and application of concepts learned.
Group discussion: Have one group volunteer to share their work with the class. Visibility for the whole class will be key.
Address misconceptions as students share.
Ask open-ended questions such as:
Why do you think..?
What evidence do you have?
What do you know about the problem?
How would you find the answer to the question?
Have students complete Assessment Questions as an Exit survey (or gamify) to evaluate understanding of concepts.
Sample exit slip survey (can modify as needed):
Write down one problem you've encountered, if and how you were able to resolve it.
Write down two things you learned today.
Write down one question you have about today’s lesson.
Jumper Wires Wires used to connect from the GPIO to the breadboard. Jumper wires can have different kinds of connections on their ends, such as plugs, sockets, or alligator clips.
Switch A basic electronic component that opens or closes an electrical circuit depending on its position or setting.
Circuit A conductive path for the flow of current or electricity.
Generate and compare multiple possible solutions to a problem based on how well each is likely to meet the criteria and constraints of the problem (Performance Expectation).
Plan and carry out fair tests in which variables are controlled and failure points are considered to identify aspects of a model or prototype that can be improved. (P.E.3.4.7)
Integrate qualitative scientific and technical information to support the claim that digitized signals are a more reliable way to encode and transmit information than analog signals.
Optimizing the Design Solution Different solutions need to be tested in order to determine which of them best solves the problem, given the criteria and the constraints.

 Piper Computer Kit
 Electrician: Salary $61,590/yr
 Computer Hardware Engineer: Salary $132,360/yr
 Agricultural Engineer: Salary $130,720/yr
 Environmental Engineer: Salary $96,530/yr