Close menu

Resources


PIPER COMPUTER

Everything you need to teach STEAM effectivly using the Piper Computer Kit.

Educator Guides StoryMode Project Guides PiperCode Project Guides
PIPER MAKE

Teach fundamental STEM skills while providing a bridge to career connected learning.

Educator Guides
Best Practices Standards Glossary FAQ Educator Forum

EDUCATOR PORTAL

Close menu

ALL GUIDES


  1. What is a Computer?
  2. Executing a Plan
  3. Practicing Flexibility
  4. Completing a System

  1. Buttons & Breadboards
  2. Basic Inputs & Outputs
  3. Polarity & Audio Output
  4. Parallel Circuits

  1. Intro to Computational Thinking
  2. Loops & Sequences
  3. Events
  4. Programming with Lights & Sounds
  5. Completing Additional PiperCode Projects

  1. Extend in Storymode
  2. Design a Bot & Make Music
  3. Redesign a Stoplight
  4. Engineering Design with Piper

  1. Take Apart and Reflection
  2. Computers in Everyday Life
  3. The Environmental Impact of Computers
  4. Final Design Challenge

  1. What is Color?
  2. How Do We See Color?
  3. How Does the Color Sensor Detect Color?
  4. RGB in Computing

  1. The Water Cycle
  2. What is Temperature?
  3. What Are the States of Matter?
  4. Phase Changes

  1. Motion Introduction
  2. How Do Waves Help Us Understand Patterns?
  3. Creating Devices That Use Data
  4. Graphing Motion

  1. What is Energy?
  2. The Energy Behind Reduce, Reuse, Recycle

PIPER COMPUTER

EDUCATOR GUIDES


YOU ARE HERE

Phase 3

Lesson 3.1

Phase 3: Lesson 3.1

Intro to Computational Thinking


45 - 60 mins

Grades 3 - 8

INTRODUCTION
In this lesson, students complete the first PiperCode project, Blink, to get a basic introduction intro writing an algorithm with sequences and loops. They will learn this vocabulary and practice computational thinking skills in order to utilize pseudocode before coding in the block-based language, Blockly.

GETTING STARTED

Lesson Materials


Piper Computer Kit

Learning Objectives

This lesson introduces students to creating algorithms with loops. In addition to completing the first PiperCode project, Blink, students also engage in an “unplugged” activity to get students thinking about how coding requires exact language. In Blink students will wire a circuit with an LED and make it turn on and off at a defined rate with code.

Note: There are step by step instructions for the students to follow in the tutorials included in each project on Piper. These provide directions both for writing code and for building the electronic circuits. The tutorials are well-defined and most students will be able to follow them with little assistance required.
Students will:
  1. Create basic commands for real-world problems and link them to coding concepts.
  2. Discover computational thinking concepts, including algorithms and loops.
  3. Demonstrate how computer hardware and software work together as a system to accomplish tasks.
  4. Determine potential solutions to solve simple hardware and software problems using common troubleshooting strategies.
  5. Make observations to provide evidence that energy can be transferred from place to place by light and electric currents.

Lesson Preperation

  • Open a side space in the room for students to move around for the first part of the lesson.
  • Create 5 sample simple tasks for the pairs to use in the Engage Activity (e.g., peeling a banana, tying a shoe, opening a door, brushing your teeth, or making a peanut butter and jelly sandwich).
  • Suggested student-to-kit ratio is 2:1 up to 3:1. Students are in the same teams as before, or make adjustments as necessary to facilitate good teamwork.
  • Make sure Piper kits are built, connected, and functioning. Ensure batteries are charged and electrical components are in the storage chest.
  • If another group of students has used the Piper Computer before, make sure the projects are reset. In the main menu of PiperCode, click on the Settings button and then “Lock All Projects”.
  • Prepare to implement PiperCode Journals as a project-based opportunity. Review NGSS Engineering Design journal options for the appropriate grade levels. Students will need to create sketches to add to their journal.
  • Create a rubric you will use to evaluate their Piper Journals and/or teamwork.

PIPER 5E INSTRUCTIONAL MODEL

Engage

Activities (5 minutes) Activity: Unplugged Ruby and Robot
  1. Turn and Talk:
    • Tell students to turn to their partner and discuss “What is Programming? If you don't know, what do you think it is?”
    • After students discuss, have the pairs draw what they think a program or code looks like.
  2. In their pairs, assign one learner to be "Ruby The Programmer” and one to be “The Robot”.
  3. Assign each pair a daily task (distribute these by writing them on notecards or just verbally providing the prompts).
  4. Tell Ruby The Programmer to explain to their partner, The Robot, how to perform the steps needed to complete the assigned task using words only (no non-verbal motions like hand movements)!
  5. Switch pairs, so that the other partner does the explaining. Note: you can keep the same task or give them a new daily task here.
  6. Have a few students share as you act out their directions without knowing the task. Discuss the importance of simple, clear instructions and sequences of instructions.
  7. Congratulate learners for creating their first algorithms with pseudocode and define these terms. (For definitions, check out the Phase 3 Vocabulary.)
**Adapted from Teachers Learning Code Getting Started Guide

Activity: Introducing PiperCode
  1. Introduce the PiperCode platform:
    • Tell students that they will be learning to code the basic functionality of controls, games, and logic for simple circuits with LEDs, buttons, switches, and breadboards.
  2. Tour of the PiperCode Interface:
    • 3.1 SLIDES - Intro Comp Thinking
    • Explain to students that once they finish coding, they will need to "run" their code. When they click START, they will notice:
      • PiperCode is running each line of code sequentially - they can see this as each block gets highlighted.
      • When they view the pin map, they will see the pins light up if the code tells a pin to turn on.
  3. Introduce "Piper Journals":
    • Tell students to draw the circuits they build and write out the code they create for each project they complete in PiperCode, as well as discussion notes about the concepts.
    • You can provide a copy of the rubric you will use to evaluate their Piper Journals and teamwork (see sample Grading Rubric).

Explore

PiperCode Project BLINK

Encourage students to complete the Blink project.

Review Piper Project Guide for Blink.

During this time, roam around the room, asking the essential questions* of this lesson:

  • Why are the GPIO pins important to allow the Raspberry Pi to interact with the LEDs? What happens if you use the wrong pin number in the code block?
    Example Answer: The GPIO pins allow the Raspberry Pi to communicate with outputs such as the LED's by connecting the pins and LEDs with jumper wires. If the code block has the wrong pin number, the Raspberry Pi cannot communicate with the LED.
  • How do you start and stop the code?
    Example Answer: You start and stop the code by clicking “START” or “STOP” in the top left corner of the screen.
  • Why do we use a Repeat Forever block to make the light blink?
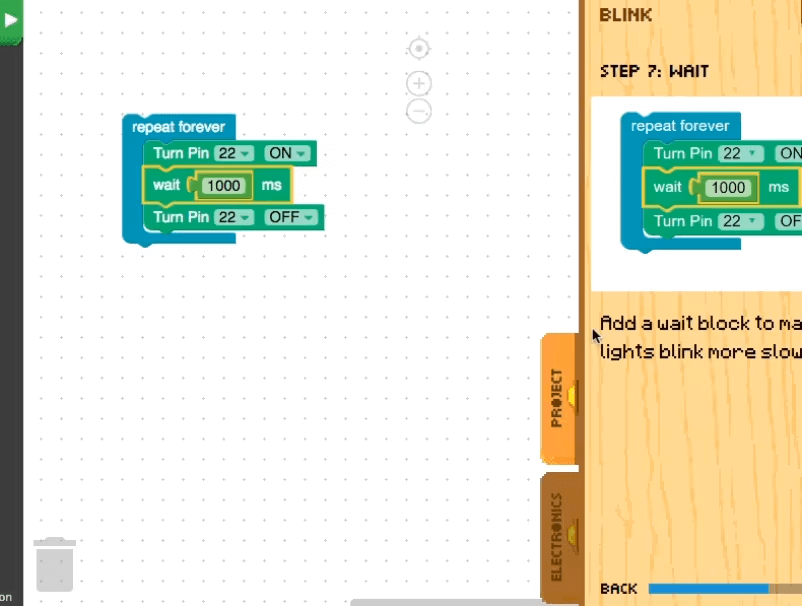
    Example Answer: We use this block because it is a loop. Without this loop, the light will only blink one time. If we want the light to keep blinking, we use repeat forever.
  • Why does running the code cause a blink?
    Example Answer: When you click start, the Raspberry Pi sends current (electrical charge) from the GPIO pin to the LED. The LED then converts the current into light.
    **Teachers: Note that you can engage prior knowledge from StoryMode lessons to discuss completing the circuit and LEDs.
  • How do you make the light blink faster, slower or longer or shorter? OR How does changing the number of milliseconds (ms) wait change the behavior of your blink?
    Example Answer: he number of milliseconds wait changes how long the light stays on before you turns off. This changes the speed of the blink. The shorter the wait, the faster the blink! Follow up question: How could you change your code so that you can control the wait time for the "off part: of the blinking?
*These checks for understanding help reinforce learning of the computer science practices of how computer hardware and software work together as a system to accomplish tasks. (CA 3-5.CS.2 (P4.4))

Explain

Vocabulary Review (10 Minutes)
  1. Review vocabulary words and definitions that were encountered during the lesson.
    • Review core terms and components from Phase 1 and 2 Vocabulary terms, especially BreadBoard, Circuit, GPIO Pins, LED, Switch, and Buttons by playing pictionary or charades.
    • Put the glossary terms on slips of paper and have team pull from a hat, giving them 1 minute to draw it or mime the function and the rest of their team has to guess!
  2. Facilitate:
    • Walk the room and check for understanding by observing breadboard and blink frequency.
    • Ask students to explain what their code is doing and how it relates to the circuit.
    • Provide feedback to students.
    • If one student in a team is not answering, encourage him/her to provide the answers.

Elaborate

Concept Review (5-10 Minutes)
  • Students take a picture of their control panel, circuits, and code. After completing projects, students take apart any circuits on separate breadboards and return parts to their proper bag in the storage bin. Pipers are put away to focus on discussion.
  • Depending on the age of your students and available time: Choose one of the Computational Thinking frameworks and introduce the main concepts using slides after “closing” slide 3.1 SLIDES - Intro Comp Thinking.
  • Ask students to reflect on which of these ideas and practices they acted out while being Ruby or the Robot.
  • EXTENSION: Choose some sample code to review as a group. Do students recognize any patterns? Are there any ways they could simplify their algorithms?

Evaluate

Teacher Led Discussion (5% of Class Time)

Student Guided Discussion/Reflection:* (optional Google doc or form). Combine a few groups together and encourage discussion of the project and new code concepts. Appoint one student as group leader who is to provide a summary of student discussion.

Provide guiding questions to start:
  • What do you know?
  • What do you think?
  • How do you know it?
  • How does it relate to a real-world engineering problem?

* Circulate classroom and observe students as they apply new concepts and skills. Assesses students' knowledge and/or skills. Look for evidence that students have changed their thinking from before the activity.

Have students document the Blink project as a project in their Piper Journal to include: Pseudocode, their block code, and a sketch of the circuit created. They should note any roadblocks and how they troubleshot solutions, or how they might build it differently the next iteration. (Provide examples of what this should look like and explain pseudocode, writing out the block code, and sketching the circuit.)

EXTENSION: Provide samples of circuit diagram components and circuit diagrams, and have students draw circuit diagrams of the projects built in this lesson in their Piper Journal.


PHASE RESOURCES

Career Connections

Data Scientist: Salary $103,500/yr
Graphic Designer: Salary $58,910/yr
Web Developer: Salary $84,960/yr
Video Game Designer: Salary $83,240/yr

Graphic Organizer

Lesson 3.1 DOWNLOAD
Phase 3 DOWNLOAD

Term Glossary


Algorithm A step-by-step set of operations performed to help solve a problem.

Code Any set of instructions expressed in a programming language. Also, one component of a programming language that has a specific purpose.

Programming The creative process humans use to develop programs or Apps. The craft of analyzing problems and designing, writing, testing, and maintaining programs for computers to solve them.

Pseudocode An informal description of a computer program's or other algorithm's operating principles, written for a human to understand instead of a computer.

View Full Glossary

Standards Alignment


We are excited to be aligned with the following standards.


Concepts Standards

Computing Systems: Devices
CA 3-5.CS.1 Describe how computing devices connect to other components to form a system. (P7.2)

Computing Systems: Hardware & Software

CA 3-5.CS.2 Demonstrate how computer hardware and software work together as a system to accomplish tasks. (P4.4)

6-8.CS.2 Design a project that combines hardware and software components to collect and exchange data. (P5.1)

Computing Systems: Troubleshooting

3-5.CS.3 Determine potential solutions to solve simple hardware and software problems using common troubleshooting strategies. (P6.2)

6-8.CS.3 Systematically apply troubleshooting strategies to identify and resolve hardware and software problems in computing systems. (P6.2

Algorithms & Programming:

Algorithms

Variables

Control

Modularity

Program Development

3-5.AP.11 Create programs that use variables to store and modify data. (P5.2)

3-5.AP.12 Create programs that include events, loops, and conditionals.

3-5.AP.13 Decompose problems into smaller, manageable tasks which may themselves be decomposed. (P3.2)

3-5.AP.14 Create programs by incorporating smaller portions of existing programs, to develop something new or add more advanced features. (P4.2, P5.3)

3-5.AP.17 Test and debug a program or algorithm to ensure it accomplishes the intended task. (P6.2)

3-5.AP.18 Perform different roles when collaborating with peers during the design, implementation, and review stages of program development.

6-8.AP.10 Use flowcharts and/or pseudocode to design and illustrate algorithms that solve complex problems. (P4.1, P4.4)

6-8.AP.11 Create clearly named variables that store data, and perform operations on their contents. (P5.1, P5.2)

6-8.AP.13 Decompose problems and subproblems into parts to facilitate the design, implementation, and review of programs. (P3.2)

6-8.AP.14 Create procedures with parameters to organize code and make it easier to reuse. (P4.1, P4.3)

6-8.AP.15 Seek and incorporate feedback from team members and users to refine a solution that meets user needs. (P1.1, P2.3)

6-8.AP.17 Systematically test and refine programs using a range of test cases. (P6.1)

6-8.AP.19 Document programs in order to make them easier to use, read, test, and debug. (P7.2)

Impacts of Computing and Social Interactions

3-5.IC.22 Seek and explain the impact of diverse perspectives for the purpose of improving computational artifacts. (P1.1)

6-8.IC.22 Collaborate with many contributors when creating a computational artifact. (P2.4, P5.2)

Practices

P1. Fostering an Inclusive Computing Culture

P2. Collaborating Around Computing

P4. Developing and Using Abstractions

P5. Creating Computational Artifacts

P6. Testing and Refining Computational Artifacts


Concept Standard

Make observations to provide evidence that energy can be transferred from place to place by sound, light, heat, and electric currents.

Apply scientific ideas to design, test, and refine a device that converts energy from one form to another.

Generate and compare multiple solutions that use patterns to transfer information.

Generate and compare multiple possible solutions to a problem based on how well each is likely to meet the criteria and constraints of the problem (Performance Expectation).

Plan and carry out fair tests in which variables are controlled and failure points are considered to identify aspects of a model or prototype that can be improved. (P.E.3.4.7)

Integrate qualitative scientific and technical information to support the claim that digitized signals are a more reliable way to encode and transmit information than analog signals.

Digitized signals (sent as wave pulses) are a more reliable way to encode and transmit information (inputs and outputs).

Evaluate competing design solutions using a systematic process to determine how well they meet the criteria and constraints of the problem.

Optimizing the Design Solution Different solutions need to be tested in order to determine which of them best solves the problem, given the criteria and the constraints.